Take my Advice: Don’t invest a lot of money in supplies and/or equipment. For many things you can create you won’t need them.
Some supplies can even be free or found like a plastic spoon, a smooth flat rock or a tongue depressor. Take a class at a local Ceramics studio or try some handbuilding techniques yourself first and see if you like working with clay. It takes time to get used to and some people become connected with the clay and understand it while others, unfortunately, get frustrated and decide it’s not their artistic medium. I’m not sure if you’d be comfortable working with clay if you are a neat freak! But like all Art Mediums the more experience and practice you get the more comfortable and proficient you get.
I personally have more experience working with a strong high fire stoneware clay body so I can’t speak for other types of modeling clay currently out there on the market.


Some of the equipment and supplies that you will see in a Ceramics studio include:
Heavy wooden work tables covered with canvas – covering the surface of your work space with canvas allows you to work with the clay without it sticking to the surface because the canvas can breathe and absorb moisture. Some work tables have a layer of plaster in them which also makes a good work surface.

This is my work table. It actually is a pressed wood folding office table that I purchased fairly cheaply. I cover it with canvas.

You can cover any sturdy table with canvas. You can use a staple gun or duck tape to secure it so it won’t move while your working on it. Canvas can be found fairly cheap and can taken off and beaten outside to remove dry clay or you can easily replace it.
BUT (Take my Adice) Plaster is used for tables like this and for slip cast molds but if any of it gets mixed into your clay body by accident it will contaminate it and it may not survive firing!
In other words you want to keep plaster away from your clay!
Large Garbage Cans for scrap clay - Scrap clay can be reused by collecting it in an air tight container and adding water to help break down dry particles and then remix and let sit uncovered (perhaps spread out on a board) to gradually dry.
Pug Mill: Scrap clay can be remixed by putting it through a Pug Mill. This machine also helps to mix and compress clay that has been made in a large mixer.

Mixers: It can save money to buy clay in dry bulk and mix your own clay body. Most University and some Community College Ceramic Studios mix much of the clay themselves. You have the freedom to customize your clay for what you are making. For instance I use a heavier clay with more grogg in it to help it stand up in some of my larger slab constructed pieces. See supplies for types of grogg that can be used.

Mixers should be set up with dust hoods and exhaust vents to prevent inhalation of clay particles that could be harmful to your lungs in time.


Kilns: Kilns come in many sizes and types.
Electric kilns come with timers but Pyrometric cones should still be used
Pyrometric Cones: These are made of clays of different firing levels. These are used to safeguard over firing your ceramics. If clay is fired at a higher temperature than what it can withstand it will melt to your kiln shelf! Before firing a load in a kiln you want to stick 3-4 of these into a piece of clay in order of temperature leading up to the maximum you want to reach. Position this stand of cones on a kiln shelf where you can see it from one of the peep holes. As you gain experience firing ceramics you will be able to tell by the red, translucent quality of the pieces you are firing if they have reached the vitrified state but always use cones to safe guard against over firing.

Ceramic throwing Wheels: Wheels come in electric with a foot control or manual kick wheels.

Ceramic Tool Sets: There are many different beginner to advance tool sets that you can purchase – these are a couple examples I found on the Web.
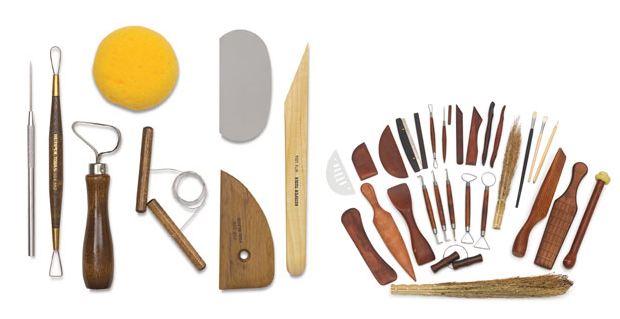
In the smaller beginner set from left to right, first is a Pin Tool, then a Wire Carving Tool, A Kidney Carving Tool, A sponge, A Wire Tool, metal and wood Ribs used for smoothing and shapping, and another wooden tool for carving and reaching hard to get at areas. As you can see there are more choices in what comes in a set – but these are some of the most popular ones.
Rib Tools: These come in many shapes and you can purchase them in metal or wood. The name however was from nature so If you can imagine a smooth flat rock or bone?

Tools for Carving: These can be wire thin or thicker metal. I personally have a couple Dental tools that are my favorite and I have used them for years.

Sponges: Natural Sea sponges are best and for using while your throwing on the wheel an Elephant Ear Sponge is soft and small and can help you shape the rim or smooth and extract water from your piece.

Tools for Rolling out Slabs: Rolling pins and other style rollers can be purchased specifically for rolling out clay. However my favorite is a wooden rolling pin I used to use in my Kitchen. Longer rolling pins make it easier to make large slabs even and you can also use a Slab Roller that some studios have.

Boards or Bats: You can purchase boards and circular bats but you can also use scrap boards they will come in handy for moving wet projects.
Banding Wheels: These are similar to a lazysusan for your Ceramic project. It can be used for building a coil pot or decorating a thrown pot.

Calipers: These are used for measuring to make a top that fits.

Special Ceramic Brushes: – made with Squiral hair or pony, polecat, or camel.

Lesson plans with instruction can be found on Dick Blicks Art Supply site and others – don’t limit your search for knowledge to me.

There are many other stores and distributors on the Web – please explore like I have and compare!
After showing you most of the equipment and supplies that can be purchased I want to show what I use. Here is another picture of my work table, covered with canvas that I purchased at the local supermarket, with all my favorite tools. I don't have much but I have my favorites. As I said before you don't have to spend much and you can make whatever you can dream up.

No comments:
Post a Comment